
Mold setting procedure can be fast and simple with magnetic mould clamping system. In the past, the mold setting procedure is always tedious and lengthy. But with the magnetic mould clamping system, you don’t have to worry about that.
Traditional mold setting procedure
Before the Quick Mould Change system, we had to use bolts, nuts and clamps to fix the mould on injection moulding machine. This was a time-consuming process and it could take a whole day to stop the machine. First, the worker had to place the mould in the exact position. Then the workers have to tighten the fixing holes one by one, which requires a lot of patience and concentration. You need to check again to ensure the fixing points are tight and no missing. Finally, you need to test the mould so that any problems can be identified and adjusted in time.
Mold setting procedure with magnetic mold clamping system
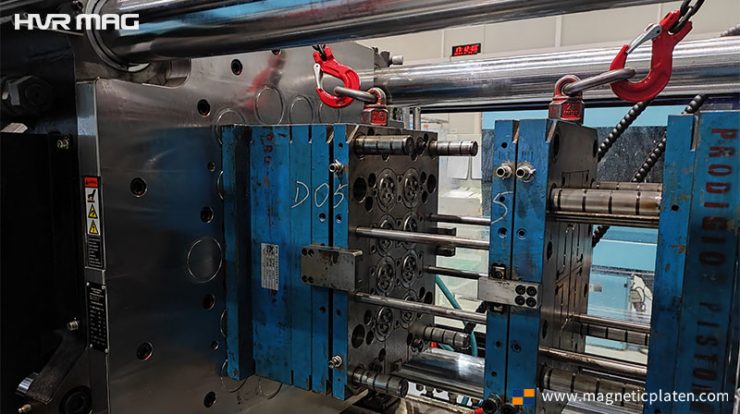
- Lift the mold into the injection moulding machine from the top or push it in from the side.
- Ensure that the mould is aligned with the locating ring, close the safety door and let the two magnetic plates cling to the mould.
- Press the magnetisation button on the control panel and wait a few seconds for the magnetic plates to fix the mould.
- Testing for proper opening and closing of moulds.
The contrast is obvious: with the magnetic mould clamping system, mold setting procedure is semi-automatic. The operator only needs to check during the installation of the mold setting procedure. For example, checking that the mould and the back plate of the injection moulding machine are clean, flat and free of oil before officially installation. Once the mould is in the injection moulding machine, check that the mould is aligned with the positioning ring. All of these steps take only a few seconds and greatly reduce the technical requirements and labour intensity of the operator. If the operator is skilled, he or she can complete the mold setting procedure in a matter of minutes.
Advantages of the magnetic mold clamping system
1. Convenience. This is by far the easiest way to install moulds.
2. High efficiency. The magnetic template only takes a few seconds to fix the mould. This reduces machine downtime and saves mould change costs. This allows you to easily produce small batches and a wide range of injection moulded products.
3. Safety. The electro-permanent magnet technology of the HVR MAG guarantees a very strong clamping force on the magnetic plate. The electro-permanent magnet has a suction force of up to 16 kg/cm². Also, there is a safety hook to ensure the mould does not fall off.
4. Smart. The magnetic plate has a number of safety features and sensors that allow you to check the real-time status of the mould on the control panel. If there are any anomalies, it will automatically alert.
5. Energy saving. Magnetic plates made of electro-permanent magnets consume very little power. The magnetic field is switched on and off by electric current. But they actually comes from the internal permanent magnet material, which does not require an electric current to maintain magnetism. Naturally, the magnetic plate itself does not generate any heat.
6. Maintenance free. The magnet plate has no moving parts inside and is not easily damaged. As long as it operates within the normal temperature range, the magnetic force will decrease very slowly, by no more than 5% in 10 years.
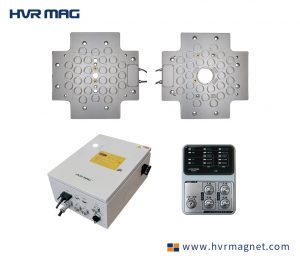
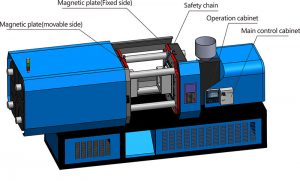
HVR MAG is a specialist manufacturer of magnetic mold clamping systems. Our magnetic quick-change system consists of two magnetic plates (moving and static), a controller and a control panel. It is also very easy to install on your injection moulding machine. It does not require a slot in the back plate. For customisation, please provide your injection moulding machine brand, model, tonnage and specific size information. Please do not hesitate to contact us.


